Monday, December 12, 2011

Christmas Star Cake Design

I wanted a dramatic Christmas star cake for a cast party (of a play where the Christmas star played a key role).  I looked for something along the lines of the Daystar -- an 8 point star with a longer tail.  CakeCentral has a template posted that showed how to do that with a sheet cake.  It uses a 12x18 inch sheet cake, which ends up being absolutely huge (about the size of a desk!).  I didn't have that much space so I decided to scale it down.  This is the result...


STEPS TO MAKE A CHRISTMAS STAR CAKE:

1.  Bake 2 cakes (I used a yellow cake recipe and increased it by half).  Bake part of the batter in an 8-inch springform round pan, and the rest in a 13x9 inch pan.

2.  Turn out of the pans and cool.  Cut edges on the round cake as seen in the photo, so that you end up with an octagon.

3.  Cut the rectangular cake into the points of the star, as shown below.

You will have leftover pieces.  Basically, cut the long tail of the star along the 13" edge, angling the top down slightly (see the piece at the bottom of the cake).  Cut three large triangles, and four smaller triangles.  These will be the star points.  

4.  Assemble into the Christmas star as shown:


5.  Frost to your preference.  I chose a fluffy white frosting (boiled icing), which gave a nice white meringue finish to the star.  Then I strewed silver balls all over for added effect.

Eat and enjoy!


Thursday, October 6, 2011

How To Make a Dragon Cake

Dragon Cake
How to tame a dragon cake, in several easy steps.

When my son requested a dragon cake for his birthday, I did my favorite thing—surfing the web for pictures or instructions.  There are some amazing cakes out there!  But, as always, it comes down to what I am able to actually make myself, and what ingredients and decorating tools I can find.  So, after looking at several examples, here's how I did it:

1.  Bake a 2-layer round cake, and 4 cupcakes.

2.  Cut one of the layers in half, layer with jam or frosting and stack.  This will stand upright on the flat edge to form the dragon's body.

building a dragon cake

 3.  Cut the other layer into the needed dragon parts:  snout, tail, neck, legs.  You can see from the picture that I cut a thin crescent shape for the tail, 2 triangle wedges for the snout and a roughly rectangular curved piece for the neck.  The remaining bits and pieces were used for angles and height and smaller body parts.


how to make a dragon neck and head


4.  The Snout:  Stack the two triangular wedges together, with jam or frosting in between, to form the snout.  

Place the tail behind the body of the dragon.

Put a small wedge of cake at the front of the body and prop the neck of the dragon on it.


Adding the dragon's head

5.  The Head:  Cut the tops off of two cupcakes so that they are level.  Stack two or three cupcakes on each other to form the dragon's head.  I ended up using three, with the top cupcake still rounded on top.  

I also experimented with where to place the head.  Originally, I thought that I would use two cupcakes and place them on the neck, behind the snout, but that seemed too high to me.  I ended up moving the snout forward and putting the cupcake head between the snout and the neck.  I also used a piece of the leftover cupcake to raise the neck in front a bit.  

If you want extra stability, stick a bamboo skewer vertically through the cupcakes to keep them from tipping over.  You could use another skewer horizontally through the whole head area to further the stability of the pieces.
  
finish building the dragon's body

6.  The Legs:   Cut the remaining two cupcakes in half, horizontally.  

Use the rounded halves as the rear legs of the dragon (see picture).  Stick them on with frosting or jam, and use a small piece of skewer to further secure them to the side of the dragon's body.

Out of the remaining cake pieces, cut two small triangle wedges.  These will be the front legs.  Adhere them with jam or frosting and skewers to the body of the dragon.  (It will really help if these pieces of cake are frozen as they tend to crumble into bits when frosting otherwise.)

7.  Crumb coat the entire cake with a light layer of frosting, the color of your choice.  I had originally wanted to do a khaki green dragon but didn't have the right colors, so I ended up with more of a Chinese dragon look— going for orange.  It took a lot of fiddling with red, yellow and orange to get a strong enough color (that didn't look pink).  In the picture below, you see that it started off a bit pink, but by the afternoon, it had darkened nicely.

8.  Once the crumb coating is on, go ahead and frost the entire cake again, with buttercream frosting.  Lay it on thick and swirl the knife a bit to give the dragon a rough, somewhat scaly look. Thick globs of frosting also help cover any joints where cake pieces are.  

9.  Use a frosting bag or your fingers to make feet for the dragon.  This was just a blob of frosting, shaped into a roll, starting from the end of each cake leg, with the frosting smoothly joining the two.


10.  The Decorating Finish!  This is always the fun part!  For this dragon, I was able to find triangular orange gummies (also one of reasons I went with an orange dragon), and a Toblerone bar.  

As you can see, I placed the gummies in parallel up and down the spine of the dragon (with the remaining ones around the back of the head, like a collar), and the Toblerone pieces down the middle. I cut one gummi into little strips and stuck them on top of the dragon's head as hair (or something), and another to make toenails.

Next, I pushed the frosting on the snout into two indentations, and placed two oblong, indented pieces of orange-colored marzipan into them as nostrils. 

Eyes were jelly-filled mini marshmallows.  
The teeth were cut up strips of marshmallows.  
A strip of sour fruit leather was cut into strips and placed on the snout, with one end coming out of the nostrils, and flaring over the mouth onto the front of the tray.

Dragon wings for cake
11.  The Wings:  I had originally thought that I would just buy Fruit Rollups and cut them into wings;  however, when I needed them they were nowhere to be found!  Back to the drawing board.  I ended up taking marzipan, mixing it with orange food coloring (which gave it a nice mottled look), and rolling to out as thinly as possible to be the skin of the wings.

Next, I cut bamboo skewers into pieces.  I taped two long pieces together at right angles for the wing frame, then added on two shorter pieces in between for the veins or structural wing support. 

I placed the frame on the marzipan, folded the marzipan in half over the frame, then pressed and trimmed until I had the final shape.  Voila!
When the cake was ready to be presented, I added the wings to the cake (otherwise their weight would probably have caused them to fall out) by pushed the exposed skewer into the body of the dragon between the front and rear legs.  

The finished dragon cake

Make sure you take pictures before sending it out — the boys had the cake stripped of all its candy decorations in about 2 minutes!  And then they devoured the cake itself.  

I really had fun with this cake and the end result!  And my kids and their friends think I'm a pretty cool baking mom!


Monday, August 29, 2011

How to make a Cow Cake

There are lots of good sites on the web showing various cow cake patterns.  After looking at them, I adapted to make the cake below.  I was in a hurry, as it was for a cast party (we were doing a play called "8 Cow Saint" so a cow themed cake was appropriate!).
I didn't have time to make the base cakes, so just bought 2 round madeira cakes - always good for carving and shaping.

Steps:

1.  Cut the dome off one round cake to level it.

2.  Carve the head of the cow out of the second piece (as shown), and make ears and feet.  The feet are easy - just two triangles, with the tips cut off to abut the body of the cow.  Ears are roughly diamond-shaped.

3.  Use a skewer to attach the ears to the head.

4.  Use frosting to help secure legs, ears and head to the body.  Crumb coat, then frost all over.

I used chocolate frosting for a brown cow, but reserved some white for a white muzzle and blaze on its head, as well as hooves.  Eyes were Rockets (like M&Ms).  For the nostrils, I just pushed the frosting into the right shape.  

Enjoy!


Thursday, August 25, 2011

Change of Pace: Triple layer chocolate mousse cake


Sometimes a change of pace is indicated - as when it's time to make a birthday cake for my husband!  Much as he enjoys novelty cakes, he also likes elegant, gourmet taste, and so this year he specifically requested this triple layer chocolate mousse cake.  (It really is a triple layer -- it's just that the bottom layer shrunk away from the pan edge and so the middle layer spilled over and hid it!)  


This is an incredibly rich, bittersweet chocolate and white chocolate mousse, taken from the recipes of the fabulous Cook's Illustrated magazine.  So I can't share the recipe -- you'll have to get it from them!

Incidentally, Cook's Illustrated has a regular magazine, as well as online subscriptions, that is full of marvelous recipes that really work!  My husband has a standing subscription and we love trying out new things, or old things retooled.

Saturday, July 30, 2011

How to Make a Birthday 3D Train Cake


Honestly, train cakes are really easy to make, and incredibly fun!  What kid doesn't enjoy bright colored sweet things to eat, and a cake loaded with candy or sweets?!  

For this train cake, I bought 6 mini loaf cakes (queen cake, but pound cake would also work).  If you want to take the time to bake, you can also make the mini loaf cakes.  If the cake has a tendency to be crumbly, freeze it before working with it.  I sliced off the top mounds of 5 of the cakes so that I had flat train cars to work with.  I cut the sixth cake into three, and stacked one piece on a whole cake to make the engine, one on end on another to make the caboose, and sliced the third piece in half horizontally and placed it on another cake to make a slightly raised goods car.  [Alternatively, you can buy 3D cake pans from Wilton or Nordicware.  There are some cool things available!]
Now the fun part -- decorating!

I made buttercream frosting and divided it into 5 bowls, then colored each bowl a different color (I chose blue, yellow, green, brown and red).  Whatever colors you choose, just make sure they are bright and strong!  Each train car was then frosted a different color  (don't forget to crumb coat first!).  Place them in desired order and arrangement on a large platter as you frost.

With white icing, I piped the outline of doors, windows and bumpers on the different cars.  With a larger tip I piped yellow icing in lines between the wheels.

The wheels were chocolate sandwich cookies (Oreos or something similar), stuck directly onto the icing.  

With a dab of icing, stick M&Ms (or Smarties or Rockets or Skittles) onto the center of the wheels.  Yellow and red ones can be used for the train headlights and rearlights.  Remaining candies can be pressed into the icing in whatever pattern you like.

To connect the train cars I used chocolate Pirouettes.  Any kind of chocolate or dark round or long rectangular sweet you can find will work well as the connecting tongues (licorice, for example).

Now for the train cake toppers!  

The engine needed a smoke stack, of course!  For that, I used three marshmallows, mounted on a bamboo skewer, and rolled in decorating confetti balls (you may need to moisten the marshmallows slightly).

Being a steam engine, it needed a coal car.  Chocolate puff cereal made excellent lumps of coal, piled on within a piped rectangular "coal holder."

An animal cage car seemed in order as well.  (I guess this was really a circus train cake!)  Animal crackers were stuck in the middle of the car and candy sticks were used for the cage bars.  The roof was a bar of chocolate (it got a bit heavy, to it might be wise to bolster the cage with long skewers at the four corners).


The next car was just a great place to carry "balloons" or wrapped lollipops, and the final car, the caboose, just had a lot of candies stuck all over it, with another chocolate Pirouette on the back as a rear bumper.

This was my little one's first 3D birthday cake, and he was enthralled!  He spent the morning leaning on the table gazing at his cake.  I call that a success!


Tuesday, July 19, 2011

Hamburger Cupcakes a winner!

These are the most fun little cakes imaginable for a party!  My son had his party on a separate day from his birthday and we went to a water park to celebrate.  He had requested a dragon cake this year (I'll post that later), but I didn't want to take something like that on an outing.  Looking around, I came across the idea of hamburger cupcakes.  Perfect!  My son loved the idea and they were so easy to make and pack up!

I've seen pictures of hamburger cakes (full size cakes), but really liked the idea of individual hamburgers for the kids.  They liked it too.

As I said, these are very easy to make.  You will need:
*  1 13x9 inch yellow cake (from a mix or from scratch - I always do mine from scratch).  Pour the batter into greased muffin cups (no paper holders) and bake.
*  1 13x 9 inch batch of brownies (the fudge-y kind)
*  1 batch of buttercream frosting, tinted red and green
*  Marzipan tinted yellow


1.  When everything is ready, cut the brownie into circles with a cookie cutter (or top of a glass or jar).

2.  Cut the yellow cupcakes horizontally in half.

3.  Place the round brownie between the two halves of the cupcake.

4.  Pipe green frosting around the bottom to look like frilly lettuce.

5.  Pipe red frosting around the top for the ketchup.

6.  On some of the "burgers" place a square of yellow marzipan for your cheeseburger cakes.  (You can use fondant if you have that on hand.  I have not worked much with it, and it takes awhile to make, but I do have ready access to blocks of marzipan, and it kneads and shapes really well.)  You can always purchase some from Amazon if you don't know where else to get it.

7.  Press sesame seeds onto the tops of the "buns."


Voila!  Tasty, realistic looking hamburger, or cheeseburger cupcakes!  Try them on your next picnic.

Saturday, July 2, 2011

How to Make a Kitty Litter Cake

This cat litter cake is the obvious accompaniment to a cat cake, or cat-themed birthday!  Caution -- make sure your cake receiver has a sense of humor!  I made this for my son and a group of his friends; seriously, what 10 year old boy wouldn't love such gross humor?  Hmm, well, the gross factor was hard for my son to overcome!  However, once he was persuaded to take a taste, he liked it!  My 6-year old had no problems!
Cat litter cake

It's very easy to make, following a basic dirt cake recipe:

1 chocolate cake
1 yellow cake
10-15 tootsie rolls  (you can also make these from scratch from this recipe:  click here)
1 large box of vanilla pudding
1 package vanilla wafers or other sturdy yellow biscuits (e.g. Marie biscuits)
Green food coloring
New cat litter scoop  (or sieve spoon)
New cat litter pan  (or roaster, or plastic pan)

Mix the pudding according to the directions and let it set up.
Bake both cakes and let them cool. Crumble the cooled cakes into pieces into the kitty litter pan. Mix the pudding into the crumbled up cakes. The cake will be just moist, not soggy.
Crush the wafers or biscuits until they are finely crumbled. Remove ¼ cup of the crumbled  up cookies and mix them with a few drops of green food coloring. Set this aside.
Sprinkle the crushed up biscuits over the cake and pudding mixture.  Top off with the reserved green dyed crumbs.
Warm up the tootsie rolls a few at a time in the microwave until they are warm and can be shaped. Shape the tootsie rolls until they resemble cat poop.  If you are making the tootsie rolls from scratch then it is easy to shape them as you want.
Insert the tootsie rolls in the cake/pudding mixture so that part of them is showing. Add a couple of tootsie rolls on the top and dangle some off of the sides of the litter pan.
Put the scoop beside the litter box on the table to serve the cake with.

Enjoy the horrified comments!

Monday, June 20, 2011

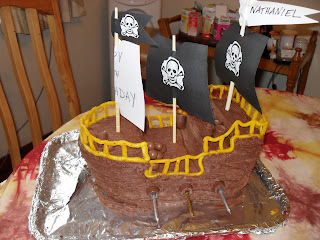
How to Make a Pirate Ship Cake and Treasure Chest Cake

What young boy doesn't want a pirate ship for a cake?  And what party of kids don't want to devour a treasure chest made of cake and candies?  There are many wonderful pirate ship examples on the internet which I pondered.  The final choice was made by my son, though, who liked the look of a pirate galleon.  So here's my novelty pirate ship cake!
Pirate ship and treasure chest cake
This is an easy cake to put together.  The longest part is in the decorating - as always.

How to Build a Pirate Ship Cake

1.  I made 2 rectangular cakes (13x9 in.).  Chocolate seemed appropriate, as any crumbs coming through the frosting would be more wood-like.

2.  To get a substantial ship, I trimmed about 3 inches off the length of both cakes, making them each 13x6 in. rectangles.  

3.  Cut one cake into 3 pieces:  approximately 3x9, 4x9 and 5x9 (or 6x9, depending how much space you want between the rear deck and the foredeck).

4.   Stack the trimmed 13x3" pieces on top of the remaining 13x6" cake, holding it together with jam or frosting (I prefer jam - it's a little less sweet than frosting everywhere).

5.  Use the other trimmed pieces of cake to fill in the deck before stacking the top decks.


6.  Stack the short pieces as shown above, so the rear deck has two levels.  Trim the front of the cake into a "U" shape, making sure that you trim all the way to the bottom, sloping in at an angle (this works best if the cake is frozen).


With all the weight on the back of the cake, it tended to lean backwards, so I propped it up with a wedge of cake underneath the rear.

7.  Crumb coat the cake with chocolate frosting.

8.  Frost the entire cake in dark brown chocolate frosting.  I used a fork dragged through the frosting to give a plank-like look.

9.  Add the decor - railings, sails, cannons, etc.  I made the railings out of marzipan, tinted bright yellow. I rolled several ropes of the marzipan, cutting smaller sticks for the upright rails and keeping long ropes for the hand railing.  It would have been better if I had used pieces of toothpicks and rolled marzipan around them for the railings, but I didn't think of that until after.

10.  Stick the railings around the ship, then place the top railing, pinching at the joints to secure.
11.  Sails were made from chopsticks (can also be bamboo skewers) and paper sails.  The pirate sail template was downloaded from the internet, printed on white paper, cut out and run onto the masts.  Flags were cut out of the same paper.  

12.  I used Rollos as the cannon holders on either side of the ship.  Candles were stuck into them for cannons and lit at the party.  Two Rollos put together make great barrels for the deck, and malt balls piled up are fantastic cannon balls.

13.  Add any other decorations you like - windows, pirates (I couldn't find my son's small plastic pirates so I went plain), swords...

14.  Tint more frosting blue and spread roughly around the ship as the ocean.  Populate the ocean with gummy crocodiles, sharks or fish - whatever you can find!

Of course, a pirate ship is not complete without a treasure chest somewhere!  I decided to add one on an island of it's own (easily transportable on a plastic plate).  

How to Make a Treasure Chest Cake
1.  Bake or buy a small loaf cake.  I used a mini queencake loaf.  Any yellow cake or pound cake will do.

2.  Cut the top off cleanly, just below where it starts to mound.  This will be the lid.

3.  Scoop out the middle of the cake in a square.  Crumble what you remove and use it as sand on the beach.  Place the treasure chest on top.

4.  Ice both pieces with chocolate frosting.  It is not necessary to frost the inside of the chest cavity.  Rake with a fork, as you did the ship, to look like wood planks.  Place the lid so that it looks like the chest has just been opened.

5.   Add blue frosting as ocean lapping on the beach.

6.  Fill the treasure chest with candy treasure!  M&Ms, Rockets, Skittles, chocolate gold coins and silver decorating balls all make good treasure.  Use silver balls to make ropes of silver throughout the chest and dripping over.
Set it on the party table and watch the kids enjoy devouring it!


Thursday, June 16, 2011

Backhoe Cake - the easy way!

Once in awhile I just can't figure out how to do a 3D cake, or I just don't have the time, or a 2D will do just fine!  When one son turned 2, he wasn't really at the age to appreciate 3-dimensional cake work; he thought anything sweet was great!  So I made a simple backhoe cake.  (Is this a true backhoe?  I think perhaps the digger should be in the back and a scoop in front.  But the 2 year old didn't know!)


Procedure:
1.  Bake a cake in a 13"x9" pan.  Any kind of cake will do!
2.  Make frosting/icing.  Basic buttercream is fine.  Divide into 3 or 4 portions and color as desired.  As you can see, I used blue, pale yellow, bright yellow and grey.  (I didn't yet have black food coloring so couldn't get a good black for the outline and tires.)
3.  Draw a backhoe, or print a drawing of it and cut out.  I drew mine freehand from pictures - whether I looked at good pictures, or am a good freehand drawer is not the debate here!  It's just for fun, and will be eaten in a few minutes anyway!)
4.  Put the cut out on the cake and use a knife to trace the outline.
5.  Fill in the big areas with yellow frosting.
6.  Using a star tip on a decorator's tube, pipe in the sky and the sand.
7.  Go over the traced line with grey or black frosting, piped through a decorator's tip (small round tip).
8.  Pipe in a steering wheel and tires.
9.  Use chocolate vermicelli and sprinkle under the backhoe to make dirt.
10. If desired, use a few dabs of white frosting to make fluffy clouds.

Ta da!

Obviously, you can be much more creative than this.  
One very simple way would be to make a basic sheet cake (or cake in a pan) and frost it to resemble dirt, or a field, or a road, then put small toy construction vehicles on top.  Some places sell them specifically as cake toppers, but any new (or clean) toy will work.  


 Or put a backhoe toy on the cake, on a road, perhaps with a Hot Wheels car coming the other way, and make sure these adorable construction cone candles are on the cake warning the oncoming traffic!


Want to just have the whole cake as the vehicle?  Then try a pan made for the occasion, like this Wilton Dump Truck Pan.

Saturday, June 4, 2011

Easter Cake

Easter tomb cake

OK, this may not be the most creative novelty cake, but I wanted something quickly for the cast of an Easter play.  I made a round layer cake and frosted it yellow (being a good spring color), but thought it was too plain.  Since the play dealt with Easter (the cross, the tomb, resurrection), I grabbed some leftover marzipan, mixed it with some cocoa powder and shaped it to look rock-like.  Grabbed some white flowers to complete the decoration.  (I guess the main part of the tomb is off the cake - this is just the rock that was rolled away from the entrance!)


Sunday, May 29, 2011

How to make a Cat Cake

This cake has probably been my favorite to make, even if there's room for improvement in my sculpting and fondant skills!
cat on a present cake
My eldest son loves cats and decided on a cat cake for his birthday last year that looked like his own cat.  There are lots of pictures and instructions for 2-dimensional cat cakes online, but I have a weakness for trying to figure out 3D cakes, so I did some searching.  There aren't too many examples of 3D cat cakes out there, but those that are pictured are amazing!  I don't pretend to be anywhere in the class of some of those cake decorators.  Like I've said before, I'm just a mom having fun with cake designs.  (Call it my inner child!)  This was also only my second time working with fondant, which I have to make from scratch  (here's a link to a fondant recipe I've used.)

How to Make a Cat Cake
Step 1:  The Present
This is simply a 9x13 cake of your choice.  I used chocolate - always a favorite!
a.  Place the cake on a tray or cake board and crumb frost.
b.  Roll out your tinted fondant and drape over the cake.  Smooth it over the cake, using a cake knife or something flat to help get sharper edges (something I didn't succeed at too well!).
c.  Trim the fondant that is overhanging at the bottom of the cake.
d.  Decorate the present with different colored fondant polka dots and a fondant ribbon (strips of fondant put together in a ribbon shape:  here's a good site that tells you how.)

Step 2:  The Cat Cake
I took the easy way out with the cake and bought one large and one small round Queen cake, which is a good dense cake that won't disintegrate when carving.  Alternatively, you can make your own 8" or 9" round cake and a 4" round (basically an oversized cupcake).
a.  Cut a semi-circle out of one side of the large round cake that is the size of the head of the cat (the small cake).  A word of caution:  I ended up with a head that was a bit oversized for the body, so measure a cat to see the proportion of head to body and cut down the cake for the head accordingly.
b.  Carve a slight ditch on the top of the large cake, from where the head will be to the middle.  This will be joint of the leg and body of the sleeping cat (see the picture).
building the cat cake
c.  Put the head in place and carve the face of the cat.  This is done simply by carving concave shapes on either side, leaving a nose bridge in the middle.  Under the nose, shape the cake in an angle inward to the ground.  I should have carved the head also along the jawline, making it trimmer and smaller for a sleek cat head.


d.  Crumb coat the cake with frosting to help the fondant hold.
e.  Transfer the cat onto the present (unless you feel able to slide the finished cat onto the present without breaking anything).  I did put the fondant on the body of the cat and the head of the cat separately, transferred them to the present and then joined the fondant at the neck, smoothing it out.
f.  Roll out your fondant (I used plain white) and drape it over the cat's body, smoothing it with your hands so that the dip for the joint is clearly seen.
g.  Drape fondant over the cat's head, smoothing it with your hands so that the curves of the cat's head and face are clearly seen.
h.  Join the head and the body at the neck, smoothing out the fondant.
cat cake fully assembled


i.  With extra fondant, roll out a tail, shape two front paws and two ears.  I made the ears the day before so that they would be hard by the time I put them on the cat.  Drape the tail around the cat, joining the fondant of the tail with the back of the cat.  Place the paws on the front of the cat.  Place the ears on the head.  I used a brush with a bit of water to make the fondant gummy where the ears would stand.
Almost done!
j.  Decorate the cat as you please!  Not having airbrushing equipment, I used a regular paintbrush dipped into a food coloring mix to paint my cat.  To paint on fondant, you need to use lemon juice or alcohol (such as vodka) to mix with the food coloring.  This will evaporate leaving only the color, and won't disintegrate the fondant.  I mixed cocoa powder with lemon juice, and black Wilton's gel paste.
The finished cat cake
I couldn't find anything great for the whiskers so ended up using pieces of spaghetti.  Not the greatest, but it got the idea across!  And it was a huge hit with my son's class!