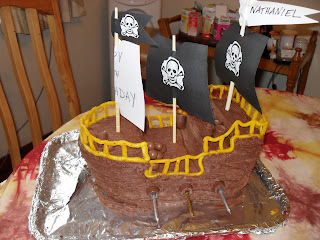
 |
| Pirate ship and treasure chest cake |
How to Build a Pirate Ship Cake
1. I made 2 rectangular cakes (13x9 in.). Chocolate seemed appropriate, as any crumbs coming through the frosting would be more wood-like.
2. To get a substantial ship, I trimmed about 3 inches off the length of both cakes, making them each 13x6 in. rectangles.
3. Cut one cake into 3 pieces: approximately 3x9, 4x9 and 5x9 (or 6x9, depending how much space you want between the rear deck and the foredeck).
4. Stack the trimmed 13x3" pieces on top of the remaining 13x6" cake, holding it together with jam or frosting (I prefer jam - it's a little less sweet than frosting everywhere).
5. Use the other trimmed pieces of cake to fill in the deck before stacking the top decks.
6. Stack the short pieces as shown above, so the rear deck has two levels. Trim the front of the cake into a "U" shape, making sure that you trim all the way to the bottom, sloping in at an angle (this works best if the cake is frozen).
With all the weight on the back of the cake, it tended to lean backwards, so I propped it up with a wedge of cake underneath the rear.
7. Crumb coat the cake with chocolate frosting.
8. Frost the entire cake in dark brown chocolate frosting. I used a fork dragged through the frosting to give a plank-like look.
9. Add the decor - railings, sails, cannons, etc. I made the railings out of marzipan, tinted bright yellow. I rolled several ropes of the marzipan, cutting smaller sticks for the upright rails and keeping long ropes for the hand railing. It would have been better if I had used pieces of toothpicks and rolled marzipan around them for the railings, but I didn't think of that until after.
10. Stick the railings around the ship, then place the top railing, pinching at the joints to secure.
11. Sails were made from chopsticks (can also be bamboo skewers) and paper sails. The pirate sail template was downloaded from the internet, printed on white paper, cut out and run onto the masts. Flags were cut out of the same paper.
12. I used Rollos as the cannon holders on either side of the ship. Candles were stuck into them for cannons and lit at the party. Two Rollos put together make great barrels for the deck, and malt balls piled up are fantastic cannon balls.
13. Add any other decorations you like - windows, pirates (I couldn't find my son's small plastic pirates so I went plain), swords...
14. Tint more frosting blue and spread roughly around the ship as the ocean. Populate the ocean with gummy crocodiles, sharks or fish - whatever you can find!
Of course, a pirate ship is not complete without a treasure chest somewhere! I decided to add one on an island of it's own (easily transportable on a plastic plate).
How to Make a Treasure Chest Cake
1. Bake or buy a small loaf cake. I used a mini queencake loaf. Any yellow cake or pound cake will do.
2. Cut the top off cleanly, just below where it starts to mound. This will be the lid.
3. Scoop out the middle of the cake in a square. Crumble what you remove and use it as sand on the beach. Place the treasure chest on top.
4. Ice both pieces with chocolate frosting. It is not necessary to frost the inside of the chest cavity. Rake with a fork, as you did the ship, to look like wood planks. Place the lid so that it looks like the chest has just been opened.
5. Add blue frosting as ocean lapping on the beach.
6. Fill the treasure chest with candy treasure! M&Ms, Rockets, Skittles, chocolate gold coins and silver decorating balls all make good treasure. Use silver balls to make ropes of silver throughout the chest and dripping over.
Set it on the party table and watch the kids enjoy devouring it!


