Friday, May 24, 2019

Cakes still ongoing!

It's been years since I posted, but I continue to do cakes.  Here's an overview of some that have been created...
A replica of the jury table for a production of "Twelve Angry Men"

an airplane cake - obviously!

for a production of "Annie"


yes, the Coke bottle is a cake!


cake for a production of "Fantastic Mr. Fox"


edible Macbook laptop and headphones

for a production of "Midsummer Night's Dream," with Bottom the Weaver (turned donkey)

graduation cake

tuxedo birthday cake


And many, many more!

Wednesday, April 2, 2014

Wedding Cake with Edible Photos, Blossoms and Butterflies

My first wedding cake!  Blossoms, butterflies, edible photo and bling.
This past weekend I completed my first ever wedding cake!  Talk about stress!  It was for a friend who was a part of the drama cast for whom I prepared the "Rohio and Juliet" cake.  The couple wanted edible photos, the red-white-black color scheme, and eventually arrived at the preference for blossoms on the cake.
Back of the cake - on display to everyone but facing away from the wedding party

The custom in Kenya is to have some smaller cakes that are given to the parents and close family to take home; so I made a 4-tier (20 kg of cake!) for everyone, and then surrounded it with 3 family cakes, each carrying 2 plaques of the couple's photo.

Decoration was easy and fun - fondant butterflies and blossoms of various sizes, hand-painted to get a nice effect.  For fun, I got some edible diamonds and added those for decor emphasis.  Note to self- don't use them again unless I have proper edible glue.  They are made of isomalt and have a tendency to melt when stuck on with corn syrup or royal icing.  I had to replace all of them while setting up the cake at the wedding.  (They are also really difficult to get out of the packaging.  I finally discovered that they are like jelly, and was able to pry them out with a toothpick.)


I used a Wilton imprint mat to print a pattern of vines on the fondant covering the cakes.  
My biggest stress point was getting the fondant large enough to cover 14" and 12" cakes that were 5" high without breaking or stretching the fondant!  Then there were a lot of mistakes to hide - some small cracks, some creased fondant (I've really got to work on my covering and piping techniques!) - but flowers and photos cover a multitude of sins!

The main blossoms and butterflies wedding cake with edible diamonds

Monday, March 18, 2013

Rohio and Juliet Cake (balcony and stage)

I recently took a 2-week course in Sugarcraft - making and working with fondant, decorating techniques, etc.  It really helped take the fear out of fondant for me!  As a result, when it came time to make a special cake for for 90 people for our cast party, I was set!  The play, "Rohio and Juliet," was a Kenyan musical — kind of a "Romeo and Juliet" meets "West Side Story" in Kenya.  It was fabulous, and so I wanted to have a special cake for all those who worked so hard on it.  Here's the end result.


Rohio and Juliet cake:  with elements of the stage design

Top of cake with gun and rose, based on the program design

The entire cake weighed 11 kg - a total of 7 cakes!  That was enough to feed 90 people happily, and provide plenty of fun as the fondant decorative items were divided out.  One fun aspect of this cake was the edible photos.  Using a printer, the decorator shop I took the sugarcraft class from (Sweet Inspirations - check out their wonderful cakes!) printed out several photos of the cast taken during the run of the play.  I had presized them to the cake and used them as decorative elements on the top two layers.
edible photos placed all around the cake
People had fun asking for pieces of themselves to eat!  One of the first things I learned in the class was how to make fondant roses, so of course I had to have those on the cake.  Also, one of the main design elements on the play publicity was the image of a gun and rose, wrapped in vines and leaves, so of course I had to put that on the top of the cake!  
the fondant gun

Making a Fondant Gun:
Step 1:  print out a template of your chosen gun design.  Just do an internet search to find the drawing and size you want (you can also resize on your computer before printing).

Step 2:  color fondant grey.  Pat out, smooth, a thick slab of the fondant and lay the template on top.

Step 3:  Using a sharp knife, cut out the gun following the outline of the template.

Step 4:  Using fondant tools (or whatever instruments you have for marking fondant), add the design elements (the cross-hatching, lines, etc.).

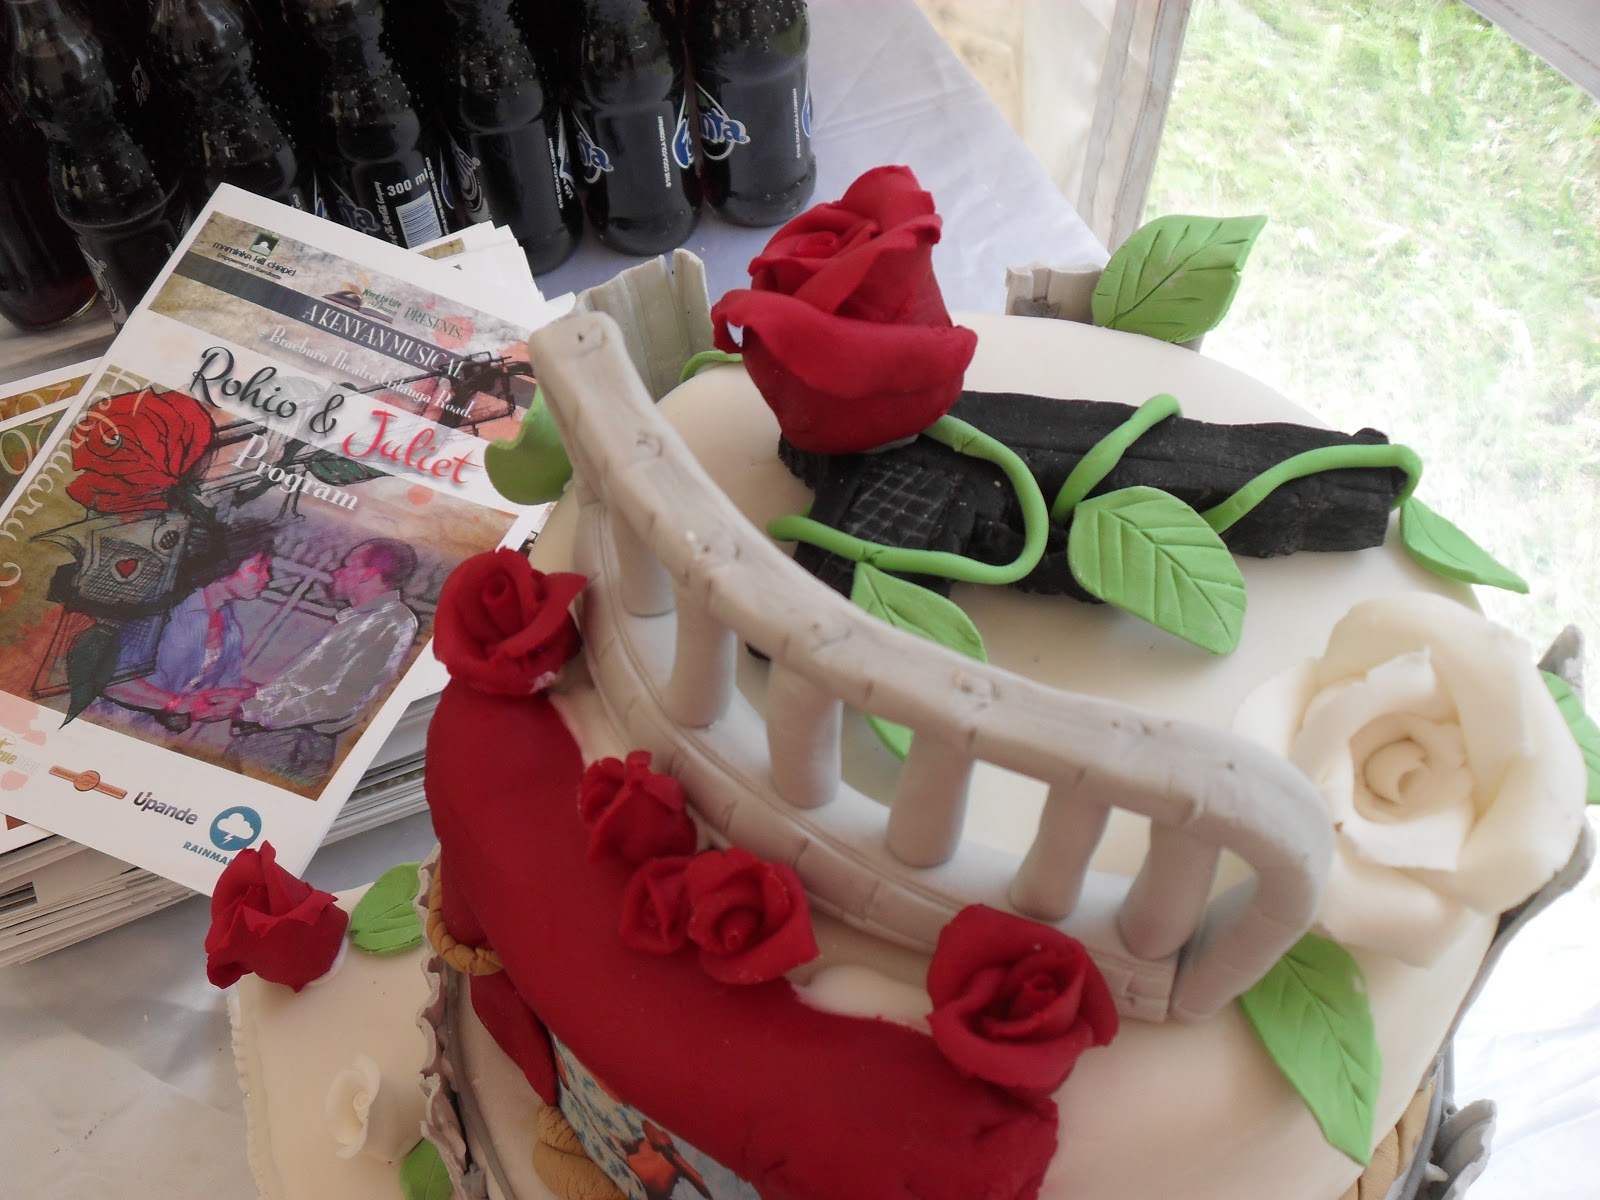
Step 5:  Paint the gun black, if desired, using black food coloring mixed with a little water.  Let dry.

Gun with vines
Once the gun was dry, I added the vines, leaves and roses.  For the vines, just roll out some green fondant in a thin rope and cut to desired lengths.  For this design, I used three ropes and draped according to the picture.  I did not put the vines under the gun, just tucked the ends into the bottom.  Then I used a tiny amount of royal icing to attach the leaves and the rose.

fondant gun and roses
The other fun design elements were the theatre stage curtains, the balcony (got to have a balcony for a Romeo-and-Juliet-type play!), and the corrugated iron (or mabati) sheets. 

How to Make Corrugated Iron Sheets (or Mabati)
Metal scaffolding and corrugated iron sheet backdrop
The corrugated iron sheets were a part of our background set, along with a metal scaffolding structure.  I wanted to use that element to frame the edible pictures on the cake.  I could probably also have made the metal barrels out of fondant, but thought that might have cluttered the overall design too much.  

mold for corrugated iron sheet
I found a great suggestion online about how to make corrugated iron sheets.  The person suggested making a mold out of dowels, so I looked around to see what I had that could be improvised into the right size corrugation.  I had lots of wooden skewers of different sizes and chopsticks.  The chopsticks were too thick, so I settled on the skewers.  These I glued onto a small square cake board. Then I colored some fondant grey, added some pastillage (great for stiffening fondant designs that need to stand firmly), and rolled out a rectangular piece.  This was then laid over the mold and pressed in firmly.  With another skewer (and also a fondant tool that was smooth) I pressed the fondant into the valleys made between the skewers.  Then I used a knife to trim the fondant to the appropriate size (in my case, 3" by 4" sheets).  These were then removed from the mold and placed on a rack to dry.  Once dry, I used black and brown food coloring to add texture and interest (and rust) to the sheets.

The finished corrugated iron sheets!
When drying, I draped the sheet ends over the rack bars to help give it a slightly rounded shape to fit around the cake.  I could have used plastic-wrapped fondant in the exact form of the cake to get a better final fit.

I attached the mabati pieces with royal icing on either side of the edible photos, and also evenly around the top layer of the cake (with the balcony).  To frame the edible photos, I used grey royal icing to pipe "metal scaffolding" pipes in each picture section.

The Romeo-and-Juliet Inspired Balcony
Romeo-and-Juliet type balcony

This balcony was quite easy.  
Step 1:  Taking grey fondant again and rolled out a thick rope for the bottom part, and shaped it into a slight mound, curving it to the shape of the top cake.

Step 2:  I rolled out another thick rope and cut it into 7 pieces for balustrades.  I ran a moistened toothpick through the middle of each and stuck them at even spaces into the bottom mold.

Step 3:  Rolled out another rope, then flattened both sides on the counter (turn the rope over once the bottom is flattened and flatten the remaining side).  This was then placed over the balustrades and draped down the side.  There was a small amount of toothpick still exposed on the balustrades that served to attach the top railing.  Attach the bottom of the railing with a little bit of water to the bottom side of the bottom mold.  Let dry!

How to Make Theatre Stage Curtains and Ropes
Stage curtains before rope and tassel

Again, these were quite simple.  

Step 1:  Take red fondant and roll it out fairly thin.  Cut into 2 equal rectangles (sized according to your cake).

Step 2:  Take each piece separately and fold into a drape.  Attach to the cake using water or royal icing (I felt royal icing would keep it more secure).  

Step 3:  Cut another rectangle, cut to fit the width of both curtains and the framing picture.  Gather the ends so that it drapes.  Attach to the top of the drapes.

Step 4:  Pinch in the sides of the curtains so that they look "drawn back."  You will then attach rope and tassels.

The finished curtains with ropes and tassels
Making the tie-back ropes and tassel   
To give the stage curtains a finished feel, and to finish off the top layer, I made fondant rope.  

Step 1:  Using brown fondant (color mix - yellow, blue and red!) roll out two thin ropes.  Twist the ropes together (around each other), then pinch off the ends.  

Step 2:  Size and attach over the curtains.

Step 3:  Roll a small ball of brown fondant and attach at the end of the rope. 

Step 4:  Making tassels -   roll out a very small square or rectangle of brown fondant.  Using a fondant knife or scissors, cut it into strips, almost to the edge, but make sure that you have an uncut strip holding it all together.

Step 5:  Moisten the top strip with a bit of water and roll the square up.  Pinch the top and attach to the ball.  This will give you the tassels hanging down.  Easy!

I rolled a thicker rope to wrap around the bottom of the cake to give it a more finished look.

For the cake itself, I made 7 cakes for the 3 different layers:  yellow, chocolate and orange, filled with orange buttercream, lemon buttercream and strawberry jam.  For crumb coating I used the lemon and orange buttercreams.  

Wooden dowels were very necessary to stack the cakes!  Then I placed the fondant roses and leaves around the cake, added the edible congratulations message, and used a grass fondant tool to finish off the fondant around the bottom layer. 

It was almost a crime to cut into the cake after all the work, but it was so much fun!  It was a great way to continue remembering the play that we all worked so hard on!


Saturday, December 29, 2012

Army Tank Cake

Army Tank Cake
I made this cake some years ago for my son, who was really into army tanks and airplanes.

I didn't document at the time how I made it, so this is just going off of a distant memory...

The body of the tank cake is made from a square cake.  It is in 2 layers, with the bottom layer slightly bigger all around than the top layer.  The front and back of the top layer are shaved diagonally down to create the sloped sides.

2 small round cakes (cupcakes) were also made.  One, with proper trimming, became the turret on top, while the other was cut in half and used as the front of the rolling tread tires.  They are shaved on the top at a diagonal.

Decoration was also simple.  Frost with a buttercream frosting, lightly colored with cocoa powder for the tan color.  Keep some frosting separate and color a darker brown with more cocoa powder.  After frosting the tank all over with the tan color, swirl in the darker brown for the desert camouflage effect.

For wheels I used 5 chocolate sandwich cookies (like Oreos) on each side, and one on top of the turret. (The top of the cookie is pushed into the cake so that it stands on its own).

Treads were made from licorice pieces (I couldn't find licorice ropes, but could get smaller pieces which I just lay next to each other.  The gun is a Pirouette cookie, stuck into the cake.  Tinted coconut flakes served as the sand.  Voila!

Front view of Army Tank Cake

Wednesday, September 5, 2012

Volcano Cake

Volcano cake
Just a quick post with this volcano cake that I made some years ago at the request of my eldest son.  The cake itself was easy -  a chocolate bundt cake, with a smaller amount of cake baked in a small pyrex bowl or cup, then stacked on the larger cake.  I did a little bit of shaping of the mountain, but could have done more.

Frosted it with chocolate frosting, roughly applied.

As you can see, I experimented with two types of lava.  I should have left out the lighter one; it was orange buttercream frosting that I made runnier, then pooled it in the crater at the top of the cake, letting it run down the side.

The explosive lava is orange hard candy, melted, then poured onto wax paper in lava flow shapes, and left to dry.  Then I stuck it over the cake.


Monday, August 13, 2012

A Director's Chair Cake

For the theatrically-minded, here's a quick cake for your favorite director!

Any self-respecting theatre or film director dreams of sitting in their own director's chair.  I couldn't figure out how to make a 3D chair, so I went with decorating the top of a regular 9x13" pan cake.


I have easy access to blocks of marzipan, so that's what I used.  First, I colored a small amount of marzipan black, and a small amount red.  Then I downloaded a template of a director's chair, cut it out, then used it on top of the marzipan to cut our the chair, megaphone and clapper board, in the appropriate colors (the legs are the natural marzipan beige).  The director's beret I free-formed from the red marzipan.

Next, I took some white writing gel and wrote the director's name on the back of the seat, his initial on the megaphone and filled in the clapper board.  The numbers represent the month and day of his birthday and the age he was turning.

It seemed slightly unfinished, so I decided to outline everything but the clapper board in grey.

Simple, but it worked!

Sunday, January 1, 2012

Chocolate Pistachio Tarts for New Year's!


I saw these fabulous looking chocolate pistachio tartlets on the internet, and have been dying to make them!  Just got tartlet pans for Christmas, so I tried them out.  Delicious!  The recipe is here, at LindenTea.

I decorated them with red currants, whose tartness makes a wonderful balance to the rich chocolate ganache.